Tuesday, December 30, 2014

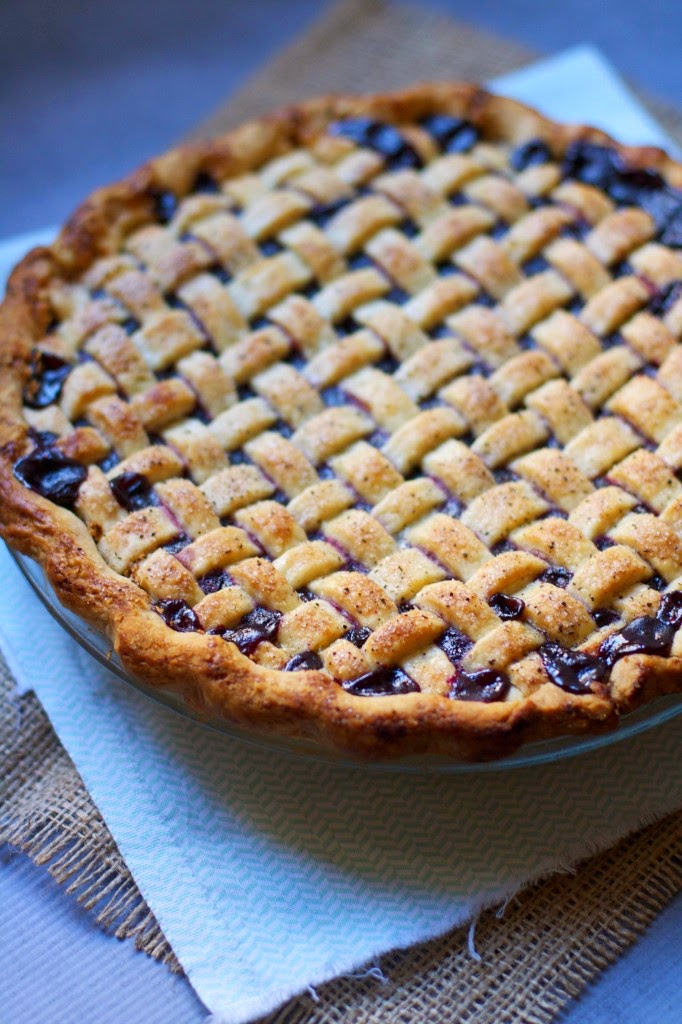
PERFECT PIE CRUST: VODKA VS. VINEGAR


When it comes to pie dough you probably have a favorite go-to recipe. But with dozens of recipes to choose from how do you know you're using the best one? You don't. But with a  bit of trial and error you can tweak any pie dough recipe to yield a tender flakey crust. 

What's the secret to a great pie crust? Cold ingredients, a quick light hand, rested dough, and the correct ratio of flour to fat to liquid. Variation in type and proportion of these three ingredients can result in vastly different pie crusts - flaky, crispy, mushy, crumbly, or tough. Varying protein content of flour contributes to a dough's texture and consistency. Lower the protein, the flakier the crusts. I like to use unbleached all-purpose flour, and equal parts butter and shortening for my fat. Butter for taste, and shortening for tenderness. As for the liquid, the options range from plain ice-cold water, milk, apple cider vinegar diluted in water, or a 50/50 split of water and vodka. 

For years, bakers have debated the use of vinegar versus vodka. Why either, why not just ice water? Gluten. Gluten is formed when water is added to flour. Gluten gives a pie crust its shape, but too much gluten can yield a tough or chewy crust. But you need enough liquid to both bind and roll out the dough. The solution? Vinegar or alcohol. Neither react with the flour to create gluten; replacing half the liquid in your dough recipe with vinegar or alcohol means less gluten formation. Some people think vodka is the way to go as it is roughly 50% alcohol; when the alcohol burns off during the baking process the amount of liquid is reduced, yielding a more tender and flakier crust. You can replace 50% of the liquid with any type of alcohol, not just vodka. 

Personally I've never really noticed any difference with either vodka or vinegar; plain ice-water works just fine for me. Why don't you give it a whirl and see if either makes a difference to your pie dough recipe. 

The following recipe for vodka pie dough comes from Cooks Illustrated via KCRW. This recipe is best for double-crust pies as single crusts tend to shrink, particularly when blind baking. 

Cooks Illustrated's Vodka Pie Dough
2 1/2 cups (12.5 ounces) unbleached all-purpose flour
1 tsp table salt
2 tbsp sugar
12 tbsp (1 1/2 sticks) cold unsalted butter, cut into 1/4-inch pieces
1/2 cup cold vegetable shortening, cut into 4 pieces
1/4 cup cold vodka
1/4 cup cold water
  1. Process 1 1/2 cups flour, salt, and sugar in food processor until combined, about 2 short pulses. Add butter and shortening and process until homogeneous dough just starts to collect in uneven clumps, about 15 seconds 9dough will resemble cottage cheese curds and there should be no uncoated flour.) Scrape bowl with rubber spatula and redistribute dough evenly around processor blade. Add remaining cup flour and pulse until mixture is evenly distributed around bowl and mass of dough has been broken up, 4 to 6 quick pulses. Empty mixture into medium bowl. 
  2. Sprinkle vodka and water over mixture. With rubber spatula, use folding motion to mix, pressing down on dough until dough is slightly tacky and sticks together. Divide dough into two even balls and flatten each into 4-inch disk. Wrap each in plastic wrap and refrigerate at least 45 minutes or up to 2 days. 

Monday, December 29, 2014

FIRST PRIZE PIES S'MORES PIE

via butter and scotch

I spent the last few days in Joshua Tree / Twentynine Palms / Yucca Valley / Pioneer Town celebrating my friend's 50th birthday. Most of us camped out at the Tile House, an amazing mosaic house located 7 miles from 29 Palms and the east entrance of Joshua Tree National Park. This quirky desert homestead was an explorer's delight with unexpected treasures hidden in every nook, crevice, and cranny. When the sun went down each evening, the night skies sparkled with a plethora of star constellations. It was a fun get-away with good food, good music, and great people.


My only regret is that we never got around to roasting marshmallows -- the evenings were way too cold. I came across this recipe for S'Mores Pie from Allison Kave of First Prize Pies via T Magazine. It would have gone down perfectly this weekend. 

First Prize Pie's S'Mores Pie
1 1/2 cups graham cracker crumbs (10-15 graham crackers)
8 tbsp melted butter
7 ounces milk chocolate, broken in chunks
1 cup heavy cream
1 egg
pinch of salt
1 tsp unflavored gelatin
1/2 cup cold water, divided
3/4 cup sugar
1/4 cup light corn syrup
1/2 tsp vanilla extract
  1.  Make the crust. Crumble graham crackers into the work bowl of a food processor and process until finely ground. Alternatively, you can put them in a bag and whack them with a rolling pin until finely crushed. Pour melted butter into crumbs and mix (hands are best for this) until the butter is fully incorporated and the texture is that of wet sand. Butter or oil a 9-inch pie pan and firmly press the graham cracker crumbs against the sides, then against the bottom of the pan (the underside of a measuring cup works well for smoothing the bottom crust). Chill for at least 30 minutes to avoid crumbling when serving.
  2. While the crust chills, preheat the oven to 350 degrees and prepare the chocolate filling. Put the chocolate in a large mixing bowl. Heat the cream in a saucepan until scalded — do not boil. Pour the cream over the chocolate and allow to stand for 1 minute. Whisk the cream and chocolate together until glossy and smooth. Add a pinch of salt, then crack the egg into the chocolate mixture and whisk to fully incorporate. Pour into chilled crust and bake for 25 minutes, or until the filling is set but still slightly wobbly in the center. Remove from the oven and cool completely.
  3. Prepare the marshmallow topping. Pour 1/4 cup water into the bowl of a stand mixer and sprinkle the gelatin on top. In a large saucepan over medium-high heat, stir together the remaining 1/4 cup of water, sugar and corn syrup just until sugar is dissolved. Heat until a candy thermometer reads 260 degrees, or hard-ball stage. Remove from heat, turn stand mixer to medium speed to begin beating the bloomed gelatin, and slowly pour in sugar syrup, scraping any remaining syrup from the pan with a heat-proof spatula. Begin increasing the speed of the mixer, avoiding any splashing, and beat until the mixture is white, fluffy and tripled in volume. Add vanilla and beat for a few moments more. Pour the mixture onto the cooled chocolate layer, gently spreading it to the edges of the crust with a spatula. Refrigerate, uncovered, 30 to 60 minutes.
  4. The last step: brûlée the marshmallow. A torch is best for this (a propane torch from the hardware store or a butane crème brûlée torch). If using a torch, clear the area of any flammable items, ignite the torch, and slowly wave the flame over the surface of the marshmallow until you achieve the desired level of toastiness. If you do not have a torch, use the broiler of your oven. Preheat the broiler, cover the edges of the pie crust with foil or pie shields, place the pie on a baking sheet and broil — watching carefully to prevent burning — for 2 to 3 minutes, rotating as necessary.
  5. To slice the pie, it helps to dip your knife in hot water, then dry it with a towel. The heat facilitates easy slicing through the marshmallow layer. Serves 8. From Allison Kave of First Prize Pies.

Friday, December 26, 2014

THE SOUTH'S BEST PIES

ph: becky styaner via southern living

Here's a galore of the South's Best Pies via Southern Living. My favorite pies are key lime and coconut cream. What's yours?

Monday, December 22, 2014

UNITED STATES OF PIE


My friend Yoko hosted a wonderful soiree this afternoon to sell her beautiful handmade pottery and ceramics. We baked a couple of pies especially for the event, and to our delight another friend brought fresh out-of-the-oven apple and wild blueberry mini tarts. It wasn't long before we were all talking pie--baking tips and techniques, favorite pies, we even planned a 2015 pie baking jubilee in a couple of weeks to kick of the new year! 

Yoko's husband also turned me onto a cookbook I'd never heard of before-- United States of Pie. It sounds amazing and I wanted to share it with other pie lovers. Author Adrienne Kane includes more than 50 regional pie recipes from all across the country. The recipes are updated modern interpretations of old classics from her collection of pie recipes from newspaper clippings, church cookbooks, and grandmothers' recipe cards. The cookbook is divided into four regions: Northeast, South, Midwest, and West, so no matter which part of the country you hail from, United States of Pie is sure to include not only old standards but also one of your favorites. I can't wait to check it out. It's definitely on my wish list. 

You can also check out this interview with Adrienne Kane on NPR

Friday, December 19, 2014

NUTS FOR WALNUTS

ph: andrew ingalls
We see plenty of pecan pies over the holidays but not as many walnut pies. How about one made with browned butter with a sour cream topping? This recipe for Brown Butter Walnut Pie with Sour Whipped Cream appeared in the November 2013 issue of Saveur magazine. 

Brown Butter Walnut Pie with Sour Whipped Cream
crust and filling:
single butter crust dough (see below)
flour, for dusting
13 tbsp unsalted butter
3/4 cup light brown sugar
6 large eggs
1 3/4 cups light corn syrup
1 1/2 tsp vanilla extract
1 1/4 tsp kosher salt
3 cups whole walnut halves, lightly toasted

topping:
1/3 cup heavy cream
2 tbsp confectioner's sugar
1 cup sour cream
1/2 tsp vanilla extract

All-Butter Single Crust
1 1/8 cups flour
1 tbsp sugar
1 tsp salt
12 tbsp unsalted butter, cubed and chilled
6 tbsp ice-cold water
  1. Whisk flour, sugar, and salt in a bowl. Using a dough blender, two forks, or your fingers, cut butter into flour mixture, forming pea-sized crumbles. 
  2. Add water; work dough until smooth but with visible flecks of butter. (Alternatively, pulse ingredients in a food processor.)
  3. Divide dough in half and flatten into disks. Wrap disks in plastic wrap; chill 1 hour before using.

Thursday, December 18, 2014

THROWBACK: BROWN DERBY'S BLACK BOTTOM PIE


The Brown Derby was the name of a chain of restaurants in LA. The first and most famous branch opened in 1926 at 3427 Wilshire Boulevard and was shaped like a man's derby hat. In 1937 the building moved a block away to 3377 Wilshire Blvd. The Derby had an astounding 60 year run before it finally closed it's doors in 1985. The menu was famous for a number of items including signature cocktails, the Cobb Salad, and Black Bottom Pie. 

If you're wondering what a black bottom pie is, it's a pie with a bottom layer of dark chocolate custard, usually topped with whipped cream and chocolate shavings. In the 1940's and 50's, home cooks demonstrated frugality by creating basic recipes that could be minimally altered to achieve a variety of different results. In this case a simple vanilla cream pie is transformed into a black bottom pie with the addition of chocolate. The following recipe was lifted from The Brown Derby Cookbook, published in 1949 by Doubleday. 


via Life Magazine, Dec 7, 1953
Brown Derby's Black Bottom Pie
2 tsp (one envelope) unflavored gelatin
1/2 cup milk
1 oz sugar (2 tablespoons sugar)
pinch salt
1 teaspoon vanilla
1 egg yolk
3 ounces sweet or semisweet chocolate
1 pint cream, whipped (2 cups whipping cream)
1 (9-inch) baked pie shell
  1. Soften gelatin in small amount of cold water for 15 minutes. Bring milk to boil in top of double boiler. 
  2. Beat together sugar, salt, 1/2 teaspoon vanilla and egg yolk until light and creamy. Add small amount of milk to egg mixture, blending well. 
  3. Return to remaining milk in pan. Cook, stirring, over hot water until mixture barely comes to boil. Remove from heat before boiling point is reached. 
  4. Press soaked gelatin free of any excess water and dissolve in hot mixture. Strain through a very fine sieve.
  5. Grate 2 ounces chocolate. Add to custard and stir over hot water until chocolate is melted. Remove from heat and beat with rotary beater until custard is smooth. 
  6. Chill until custard reaches cream-like consistency. Whip 1 cup cream until stiff and fold into custard with remaining 1/2 teaspoon vanilla. Fill pre-baked pie shell. Place in refrigerator for 30 minutes.  
  7. Top with remaining whipped cream 1 inch thick (whipped from remaining 1 cup cream). 
  8. Remaining chocolate is now shaved into curled spears and stuck in top. Dust with grated chocolate. Makes 1 pie. 
Shell Pastry Dough for Open-Faced Pies, 2 10-inch shells
3/8 c (1/4 cup & 2 tbsp) sugar
1 egg
1/4 tsp lemon rind, grated
small pinch salt
1/2 tsp vanilla (bean or extract)
2/3 c butter
2-1/4 cup flour
1/2 tsp baking powder
  1. Using an electric mixer to combine egg, lemon rind, salt, vanilla, until creamy. 
  2. Knead butter till smooth, and add to egg mixture. Then combine all in the mixer at slow speed until a paste is formed. Beat at high speed for only a moment or two. 
  3. Allow the paste to relax, and roll out thin on a lightly floured board, baking the shell at 400 º F for 10-12 minutes. 

Wednesday, December 17, 2014

CRANBERRY BLUEBERRY PIE

ph: via the baker check
During the winter months it's not always easy finding fresh ingredients for fruit pies. But I'm of the opinion that fresh isn't aways best; both frozen and dried fruits work just as well in pie recipes. Take for instance this pie recipe I found via the baker chick for cranberry blueberry pie. It calls for wild blueberries and cranberries, either of which can be frozen or fresh. The pie looks scrumptious. Can't wait to try it. 

Lattice-Topped Cranberry Blueberry Pie
1 double Pie Crust
16 ounces frozen organic wild blueberries (do not thaw)
12 ounces fresh or frozen cranberries (do not thaw; about 3 cups)
1 cup sugar
1/4 cup pure maple syrup
3 tablespoons cornstarch (or arrowroot)
3 cinnamon sticks
juice and zest of 1 small lemon
1 teaspoon pure vanilla extract

Topping:
heavy cream for brushing
1 teaspoon sugar
1 teaspoon nutmeg
1/4 of a vanilla bean scraped out (optional)
  1. In a medium sized saucepan, combine all the filling ingredients except for the cinnamon sticks. Stir mixture well until berries are evenly coated.
  2. Add the cinnamon sticks and cook over medium heat for 12-14 minutes, stirring occasionally. The berries will burst, and the mixture will reduce and thicken. 
  3. When the mixture starts to bubble like lava, stir constantly for another 2 minutes or so. Pour filling into a heatproof bowl and cool completely in the fridge. (Or use the freezer to speed things up. The filling can also be prepared up to 3 days in advance.)
  4. When the filling is ready to go, roll out one layer of the crust to a 12-inch circle and drape it over  9-inch pie pan, trimming the excess dough so there is a 1-inch overhang all around.
  5. Pour the filling into the crust. Roll the top layer of dough out into another 12-inch circle, and either drape the whole thing over for a traditional double crust, or cut the dough into strips for a lattice-top. 
  6. Trim and fold over the edges, crimping as desired.
For Topping:
  1. In a small bowl mix together the sugar, nutmeg and vanilla bean (if using.) Brush the heavy cream over the crust and sprinkle with the sugar mixture.
  2. Bake at 400º F for 50-60 minutes or until crust is golden and filling is bubbly. If the crust is getting too dark too fast, cover it with a bit of foil. 

Monday, December 15, 2014

RICOTTA-SQUASH TART


I love roasted acorn squash, especially in the winter. It's super easy to make. Simply slice length-wise in half, brush with olive oil, season with salt and pepper, then roast in the oven face down on a rimmed baking sheet for 40 minutes at 375º. Let cool, then dig in with a spoon. I came across this savory Ricotta-Squash Tart recipe on Food & Wine. Simple and delicious. 

Ricotta-Squash Tart
2 large eggs
14 ounces frozen all-butter puff pastry, thawed but chilled
all-purpose flour, for rolling
two 11-ounce organic acorn squash, rinsed and dried
1 tablespoon plus 1 teaspoon extra-virgin olive oil
2 teaspoons unsalted butter, melted
1 teaspoon honey
kosher salt and freshly ground pepper
1 pound fresh ricotta cheese
1 tablespoon heavy cream
1/2 cup thinly sliced shallots (2 large)
1/2 teaspoon sugar
toasted pumpkin seeds, for garnish
  1. In a small bowl, beat 1 of the eggs. Cut the puff pastry in half crosswise. On a lightly floured work surface, roll out 1 piece of puff pastry to a 12-inch square. Cut a 1/2-inch strip from each edge of the pastry. Brush the edge of the pastry square with some of the beaten egg. Place the strips around the edge to make a raised border. Chill for 30 minutes. Repeat with the second piece of puff pastry.
  2. Meanwhile, preheat oven to 450°. Using a large, sharp knife, cut off the ends of the squash until you reach the seeds. Scoop out and discard the seeds. Carefully slice the acorn squash crosswise into 1/4-inch thick rings. Arrange the rings on 2 rimmed baking sheets. Mix 2 teaspoons of the olive oil with the butter and honey and brush on the squash rings; season with salt and pepper. Bake for 15 minutes, or until the rings are browned on the bottom. Reduce the oven temperature to 375°. 
  3. In a medium bowl, mix the ricotta with the remaining egg and the heavy cream. Season with 3/4 teaspoon kosher salt and a generous pinch of pepper. In a medium skillet, heat the remaining 2 teaspoons of olive oil. Add the shallots and cook over moderately high heat, stirring occasionally, until golden. Stir in the sugar. 
  4. Brush the raised pastry borders with some of the beaten egg. Spread the ricotta filling in the pastry squares. Arrange the squash rings on top, browned sides up. (Note: I removed the skin first.) Scatter the shallots over the tarts and bake for 30 minutes, or until the pastry is golden brown. Sprinkle the tarts with toasted pumpkin seeds and serve warm. (Note: I omitted the seeds.)

Friday, December 12, 2014

BUTTERSCOTCH PIE WITH CURRY CRUST

ph: chris court via bon appétit
In my last post I shared an old-fashioned recipe for Butterscotch Date Custard Pie, so when I came across this modern twist via Bon Appétit I had to share it with you. Curry crust? It will either scare you or pique your interest. The proof of the pudding is in the eating. Original recipe by Kierin Baldwin. 


Butterscotch Pie with Curry Crust

Curry Crumb Crust

  • 1 teaspoon fennel seeds
  • 8 oz. vanilla wafer cookies
  • 2 tablespoons all-purpose flour
  • 2 tablespoons raw sugar or granulated sugar
  • 1 teaspoon Madras curry powder
  • ¼ teaspoon kosher salt
  • 6 tablespoons (¾ stick) unsalted butter, melted, slightly cooled

  • Filling And Assembly
  • 1 envelope unflavored powdered gelatin
  •  cups whole milk, divided
  • 3 tablespoons granulated sugar
  • ½ vanilla bean, split lengthwise
  •  cups heavy cream
  • ¾ cup (packed) dark brown sugar, divided
  •  teaspoon baking soda
  • 3 large egg yolks
  • 2 tablespoons cornstarch
  • 3 tablespoons unsalted butter
  • 1 tablespoon mild-flavored (light) molasses
  • ½ teaspoon kosher salt
  • Unsweetened whipped cream (for serving)
  • ½ cup chopped salted, dry-roasted cashews

Preparation

Curry Crumb Crust

  • Place a rack in middle of oven and preheat to 325°. Toast fennel seeds in a small dry skillet over medium heat, stirring often, until fragrant, about 2 minutes. Transfer to a small plate; let cool, then finely chop.
  • Pulse cookies in a food processor until very fine crumbs form (you should have about 2 cups). Add fennel seeds, flour, raw sugar, curry powder, and salt and pulse to combine. Add butter and pulse until mixture is the consistency of wet sand.
  • Transfer mixture to a 9” pie dish. Using a measuring cup, press firmly onto bottom and up sides of pie dish. Place pie dish on a rimmed baking sheet and bake crust, rotating halfway through, until dry and set, 20–25 minutes. Transfer pie dish to a wire rack and let crust cool.
  • Do Ahead: Crust can be baked 1 day ahead. Store wrapped tightly at room temperature.

Filling And Assembly

  • Place gelatin and 2 Tbsp. milk in a small bowl; let stand until gelatin is softened, 5–10 minutes.
  • Place granulated sugar in a medium saucepan; scrape in seeds from vanilla bean and add pod. Cook over medium heat, stirring, until sugar is melted, then cook, stirring occasionally, until mixture turns amber in color, about 3 minutes. Remove from heat and slowly add cream (mixture will bubble vigorously), stirring until smooth. Return to heat and add ½ cup brown sugar and remaining milk. Cook, stirring, until sugar is dissolved and caramel mixture begins to steam, about 2 minutes. Remove from heat, add baking soda, and whisk until bubbles subside; remove pod and discard.
  • Whisk egg yolks, cornstarch, and remaining ¼ cup brown sugar in a medium bowl. Gradually whisk in half of warm caramel mixture. Pour egg-yolk mixture into caramel mixture in saucepan and bring to a boil over medium heat, whisking constantly; reduce heat to low and cook, whisking constantly, until thickened, 2 minutes. Remove from heat and whisk in gelatin mixture, butter, molasses, and salt, whisking until butter is melted and mixture is smooth. Transfer filling to a large bowl and chill, stirring occasionally, until slightly cooled and thickened, about 1 hour. (Stirring and cooling pudding before chilling in crust will give it a luscious, creamy texture.)
  • Pour butterscotch filling into crust, smoothing top if needed. Chill until set, at least 2 hours.
  • Just before serving, spoon whipped cream over pie and top with cashews.
  • Do Ahead: Pie can be made (without whipped cream) 2 days ahead. Cover and keep chilled.

Monday, December 8, 2014

GURNEY KITCHEN TESTED RECIPES


Several years ago I came across an old recipe box labeled Gurney Kitchen Tested Recipes. The moment I peeked inside and saw a section for Pastry and Pie Filling, I knew I had to own it. In the 1950's, the Home Service Department of Gurney Foundry Co. Limited, makers of Gurney Electric Ranges, distributed kitchen tested recipe files to purchasers of their electric ranges. Popular demand for Gurney's index of individually tested menus prompted the company to make it possible for others to obtain the recipes files for $1.00. Included with over 200 recipe cards are short pamphlets on cooking techniques-- Deep Fat Frying and Sautéing, Roasting, Broiled Foods, Baking, and Pastry-- as well as ones for Cooking the Gurney Electric Way, Principles of Menu Planning, and Oven Meals. The recipes indexes range from Cocktails, Canapés, and Hors d'Oeuvres to Preserving and Confections

Here are recipes for a Standard Pastry and Butterscotch Date Custard Pie.


Friday, December 5, 2014

A BITE OF THE CHERRY


"A bite of the cherry" is a British idiom which means, 'a part of something good, especially when there is not enough for everyone who wants it.' 

So let's talk buttons and scraps. If you're any sort of a cook or baker, chances are you've probably been stuck with leftover ingredients you weren't quite sure what to do with; a case of 'a little of this but not enough of that' to actually make a second batch of the dish you originally purchased the ingredients for. So what do you do? Get creative. Some of the best dishes I ever came up with were happy accidents from scraps, leftovers, or odds and ends.

I bake a lot of pies so there are always dough scraps in my fridge, not to mention mini pie or tart crusts in the freezer ready to defrost and fill-- usually at some odd hour because of an unexpected sweet tooth or craving. This means with a little ingenuity I can always scrape together some sort of single-serving dessert. It's literally easy as pie. 

Fruit fillings are easiest to work with. I try to explore new flavor profiles by throwing together unexpected ingredients but most of the time it's just whatever I have on hand-- half an apple, a handful of assorted berries, a spoonful of dried fruit, not quite enough frozen peaches for a smoothie, a stray lemon, whatever. Sometimes I mix fresh ingredients with canned or jarred products to scrape together enough filling for one crust. At other times I may just have the one ingredient to work with. Where do you think make do pie came from?

Today, I had some cranberries, jarred sour cherries, and sage. 

A Bite of the Cherry Cranberry Pie
1 1/4 cups fresh cranberries
2 tablespoons dried cranberries
1/4 cup of jarred sour cherries (and 1 tablespoon juice)
1 teaspoon chopped fresh sage
2 tablespoons of light brown sugar
1 tablespoon arrowroot
1/4 teaspoon vanilla extract
1/8 teaspoon kosher salt
1/8 teaspoon zest of fresh lemon
  1. Position oven racks in the bottom and center positions, place a rimmed baking sheet on the bottom rack, and preheat oven to 425º F.
  2. Have ready and refrigerated one pasty-lined 5-inch mini pie pan and pastry round or lattice to top.
  3. In a heatproof bowl, pour boiling water over the dried cranberries to cover about an inch. Allow them to pump while making the remaining filling.
  4. In a food processor briefly process 1/2 cup fresh cranberries to a rough chop; add them to a bowl, along with the remaining whole cranberries, chopped sage, sugar, salt, vanilla, and arrowroot. 
  5. Drain plumped dried cranberries of excess water and add to bowl. Mix all ingredients well. 
  6. Pour the filling into the chilled pie shell, arrange the pastry round or lattice on top, and crimp edges. 
  7. Brush the pastry with a milk wash, sprinkle with demerara sugar. 
  8. Place the pie on rimmed baking sheet on lowest rack of oven.
  9. Bake for 10 to 15 minutes, then lower temperature to 345º F, and move pie to center oven rack and continue to bake until pastry is a deep golden brown and juices are bubbling, approximately 20 to 25 minutes longer. Allow to completely cool, 2 hours.

Thursday, December 4, 2014

PIE A LA APPLE


Apple pie baked in an apple? Genius. Here's what you need --

Pie A La Apple
4 large apples (Northern Spy, Golden Delicious, or Rome are the best banking apples)
1 (21 ounce) can apple pie filling OR from scratch (see below)
1 teaspoon cinnamon (or nutmeg, or allspice - whatever your taste preference)
1 store-bought pie crust - use just 1 of the 2 crusts in the box OR from scratch
  1. Preheat oven to 400º F.
  2. Slice the top off each of your apples and scoop out the inside of the apple. Paring knife and a spoon to hollow out the apple work best.
  3. In a small bowl, mix the filling with the cinnamon. Spoon the filling into the well of each apple.
  4. Unroll the pie crust and cut it into fourths; one for each apple. Then out of each quarter into 1/4-inch strips. 
  5. Lay strips of the dough on top of the apple. Then take one new strip at a time and alternate weaving it over and under the pie strips already in place. Repeat until the top of the apple has been covered. Trim excess pie crust around the edges with a knife. For a nice golden brown crust you'll need to brush it with either milk or cream, or with an egg wash (mix 1 egg and 1 tbsp water). 
  6. Place apples in a baking dish and fill with 1/4-inch of water. Bake for 20-25 minutes or until crust is golden brown. Remove from baking dish. You can eat it plain,  drizzle salted caramel over the top, add whipped cream, or eat it with a scoop of your favorite icecream. Enjoy!
Apple Pie Filling from Scratch
2 small apples (Northern Spy, Golden Delicious, or Rome are the best banking apples)
1 teaspoon arrowroot (or cornstarch or 2 teaspoons flour)
1/4 cup granulated sugar
1 teaspoon cinnamon (or nutmeg, or allspice - whatever your taste preference)
squeeze of lemon juice (optional)
  1. Peel and finely dice apples.
  2. In a medium saucepan over medium heat, cook the apples, arrowroot, sugar, and lemon juice. Stir constantly for 5 minutes. Switch to low heat and allow to simmer for 5 minutes. Remove from heat and cool for 20 minutes. 
Tip: if you believe in the idiom 'waste not, want not' then you can always used the cored out apple for your filling. Just try to keep the chunks bite-sized if possible.

The original recipe is by Girl Who Ate Everything via Tablespoon but I came across it at thekitchn.


Wednesday, December 3, 2014

STACK PIE

ph: tina rupp via drunkbakers
Have you ever tried to carry more than one pie at a time? Not easy. I bake a lot of pies for social gatherings and transporting multiple pies is a precarious balancing act. Whether heavy or delicate, some pies require a firm grip between two hands. Sturdier pies can be carried two at a time, one in each hand, in a bag or carrier. That is, if you're lucky enough to find one that won't damage your crust, gouge your cream or custard filling, or demolish your whipped or meringue topping. All that effort gone to waste!

This past Thanksgiving a friend gifted me with a vintage tin combo cake and pie carrier. It's gorgeous but bulky, and for a city girl that travels by subway, a bit of a hassle on a crowded train. Besides, I don't bake cakes. What I need is a multi-tiered stackable pie carrier. 

The other option is stack pie. I'm not sure of its origin but my guess would be church potlucks, picnics, or reunions. Back in the day it was just too hard to move a bunch of pies separately, so someone came up with the idea to stack them together. It's basically a bunch of chess pies glued together with caramel frosting. You can make as many layers as you can bake. Talk about pie in the sky. The following recipe is for a stack of four pies. 

Stack Pie
crust
You need four 9-inch pie tins and enough crust for two double-crust pies. 
  1. Divide pastry into four even pieces, flatten into 4-inch disks. Wrap in plastic; chill in fridge for 1 hour. 
  2. Let dough soften slightly at room temp before rolling out. Preheat oven to 300º F. 
  3. Roll out and line pans, but just come up to the edge, don't crimp. 
  4. Place pie pans in freezer for 10-15 minutes. 
  5. Remove from freezer and line with parchment paper, fill with pie weights or dried beans. Par-bake the crusts for 20 minutes, or until just brown. 
  6. Remove parchment paper and pie weight / beans. Brush the bottom with a mixture of whisked egg and 1 tablespoon of water. Place crusts back in oven for 1 minute. Remove and cool while you make the filling. 
filling
10 egg yolks
3 cups sugar
1 cup evaporated milk
1 1/2 cups (3 sticks) unsalted butter, room temp
1 tablespoon vanilla extract
1 tablespoon grated orange rind
pinch of salt

frosting
3 cups brown sugar
2/3 cups whole milk
2 stick butter
3 cups powdered sugar
1 dash of salt
2 teaspoons vanilla extract
  1. Turn up oven to 350º F. 
  2. Beat yolks for 3 minutes, add sugar gradually, beat to yellow and light looking.
  3. Fill the pie shells evenly. Bake 10 minutes, them with a toothpick, pop any air bubbles on tops of pies. Continue to bake 15-18 minutes, or until golden. 
  4. Immediately cut away excess pastry with sharp knife from all but one pie (this will be the bottom pie) and discard. Important: Chill pies. 
  5. Meanwhile, start frosting: melt butter in small pan. Whisk in brown sugar and bring to boil. Stir in the milk, salt and vanilla. Cool. Beat in powdered sugar in small increments until a proper, sticky, frosting consistency. 
  6. Remove three trimmed pies from their pans. Blob some frosting on the top of the bottom pie, spread around carefully. Position second pie on top. Repeat with as many pies as you have. 
  7. Slice and serve like a layer cake. Serve within 2 days.
Note: The great thing about chess pie is that the filling is a great base to which you can add other ingredients, such as nuts or fruit. You can turn this basic recipe into chocolate chess pie, lemon chess pie, buttermilk chess pie, etc. The possibilities are endless. 

Tuesday, December 2, 2014

CARDAMOM CHOCOLATE TART


My friend's son requested a chocolate pie. His wish is my command. I like my chocolate in a pâte sucrée crust so I whipped up this Cardamom Chocolate Tart instead.

Cardamom Chocolate Tart
Par-baked Pâte Sucrée (makes one 9-inch tart or 6 mini tart shells - 4 x 1 inch tart form)
8 tablespoons unsalted butter, softened (room temp)
1/3 cup sugar
1.5 tablespoons almond flour
1 egg, slightly beaten (room temp)
1.5 cups of all-purpose flour
1/8 teaspoon salt
pinch baking powder
  1. Cream together the butter, sugar, salt, and almond flour in an electric mixer.
  2. Slowly add the egg, scraping down the bowl.
  3. Add the flour and baking powder, mixing until thoroughly combined. 
  4. With minimum handling, shape the dough into a disk, then wrap in saran wrap. Chill; allow to rest for several hours. 
  5. Roll out to fit six 4" x 1" tart pans, about 1/8" thickness. Trim excess dough from edges with a knife. Chill in freezer for 15-20 minutes.
  6. Preheat oven to 325º F. 
  7. Bake the tart shells for 15 minutes, or until just barely browned. Remove from oven and allow the shells to cool while you prepare the filling.
Filling
1 1/4 cups heavy cream
9 ounces bittersweet chocolate (not more than 65% cacao), chopped
2 large eggs (room temp)
1 teaspoon ground cardamom
1/4 teaspoon kosher salt
  1. Combine the chocolate, cardamom, and salt in a large heatproof bowl. 
  2. Place the cream in a heavy-bottomed saucepan and bring just to a boil. Remove and immediately pour over the top of the chocolate. Let stand for 5 minutes, and then whisk steadily until all the chocolate is melted.
  3. Crack the eggs into a separate bowl, and whisk. Slowly stream a small amount of the chocolate mixture into the eggs, whisking as you pour. Continue until the egg mixture feels warm to the touch; then mix it back into the chocolate mixture. 
  4. Pour filling into cooled tart shell(s). Bake on the middle of the oven for 20-25 minutes, then rotate the tart(s) 180 degrees, and continue baking for an additional 10 minutes. The tart is finished when the edges are set about 2 inches in and the center is no longer liquid but still wobbly. Be careful not to overtake or the filling will be dry; the filling continues to cook and set after it is removed from the oven. 
  5. Allow to cool completely on a wire rack, 1-2 hours. Serve slightly warm or at room temperature. 
  6. To finish, dust lightly with powdered sugar. 

Monday, December 1, 2014

AN OLD-FASHIONED PIE SOCIAL HOOTENANNY

ph: via food52
ph: via food52
ph: via lifestyle mirror
Yesterday I organized an afternoon pie baking soiree with some of my closest friends. Really, it was just an excuse for the girls to get together and have a laugh while we baked pies and drank lots of wine. We baked three pies from The Four & Twenty Blackbirds Pie Book - Cranberry Sage Pie, Lemon Chess Pie, and Salted Caramel Apple Pie. I'm a huge fan of the Elsen sister's Pie Shop in Brooklyn. They have a knack for giving traditional pie recipes a modern twist by adding uncommon or unusual ingredients. And so far all their recipes have been foolproof.

I went ahead and prepped crusts for two pies as dough needs to rest for approximately 1 hour, preferably 2 or overnight, in the fridge before rolling out. This step in addition to using apple cider vinegar to the dough recipe yields a flakier crust as both actions help to inhibit gluten formation. This doesn't mean your crust will be gluten-free; it just means a flakier, therefore tastier pie crust. Another tip -- if you want your crust to brown in the oven, you'll need to brush on some kind of protein before you pop the pie into the oven to bake. You have two options: milk or cream; or for a glossy finish brush on a mixture of egg and 1 tablespoon of water.

Here is Four & Twenty's dough recipe for one all-butter 9-inch single-crust. See below for their all-butter double-crust dough recipe. 


If you're wondering what a chess pie is, it's a basic pie filling made with a mixture of eggs, butter, and sugar. Sometimes nuts or fruits are added -- in our case, juice of lemons. Chess pies are a Southern specialty but recipes vary with some calling for the addition of cornmeal and others, for vinegar. There are several folklores for the origin of the name, Chess Pie. The most likely explanation is an Americanization of the English word "cheese," referring to the English lemon curd pie filling which is very similar to that of lemon chess pie. Another suggest that it's "chests," said with a southern drawl describing pies with so much sugar they could be stored in a pie chest rather than a refrigerator. And the funniest explanation is that when a plantation cook was asked what she was baking that smelled so good, she replied, "Jes' pie."


All the pies were delicious but my favorite was the Cranberry Sage Pie -- I'll always take tart over sweetness.

Four & Twenty Blackbird Double-Crust Pie
2 1/2 cups unbleached all-purpose flour
1 teaspoon kosher salt
1 tablespoon granulated sugar
1/2 pound (2 sticks) cold unsalted butter, cut int 1/2-inch pieces
1 cup cold water
1/4 cup cider vinegar
1 cup ice
  1. Stir the flour, salt, and sugar together in a large bowl. 
  2. Add the butter pieces and coat with the flour mixture using a bench scraper or spatula. 
  3. With a pastry blender, cut the butter into the flour mixture, working quickly until mostly pea-size pieces of butter remain (a few larger pieces are okay; be careful not to overblend).
  4. Combine the water, cider vinegar, and ice in a large measuring cup or small bowl. 
  5. Sprinkle 2 tablespoons of the ice water mixture over the flour mixture, and mix and cut it in with a bench scraper or spatula until it is fully incorporated.
  6. Add more of the ice water mixture, 1 to 2 tablespoons at a time, using the bench scraper or your hands (or both) to mix until the dough comes together in a ball, with some dry bits remaining. Tip: Total amount varies but approximately 6-9 tablespoons of water for a double-crust recipe.
  7. Squeeze and pinch with your fingertips to bring all the dough together, sprinkling dry bits with more small drops of the ice water mixture, if necessary, to combine. 
  8. Divide the dough in half before shaping each portion into a flat disc, wrap in plastic, and refrigerate for at least 1 hour, preferably overnight, to give the crust time to mellow. 
  9. Wrapped tightly, the dough can be refrigerated for 3 days or frozen for 1 month.